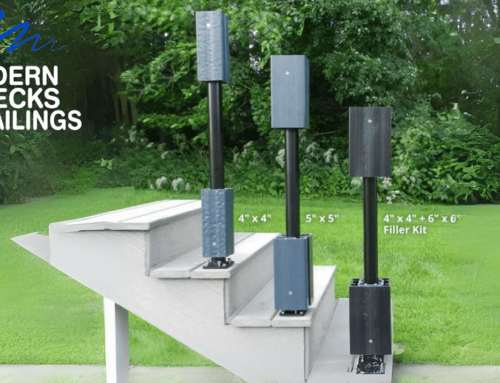
We all know that decks and porches are where people get together to have fun. There’s just one problem: When you’ve got a lot of people over, where do they all set their drinks? Well, Color Guard Railing has the perfect solution for you.
During this program, Color Guard’s Kyle Blindauer will show you how to add Party Time functionality to a normal railing with drink rail brackets.
Available for several Color Guard product lines, including the popular Lincoln Aluminum Railing and Florence Vinyl Railing, these brackets install easily to give decks a matching modern look with the added convenience of always having a place to set down a drink.
Transcription:
GMT20211208-165819_Recording_640x360.mp4
Eric [00:00:00] Hello, everyone. Welcome to today’s webinar, from Color Guard. Has this ever happened to you? You’re at a party. You’re sitting on the deck and talking to your friend over here. You put your drink on the rail and it falls down. Isn’t that annoying? Well, what if there was a solution where you could have a deck rail that matched your deck, but you could also set your drink on? That’s what we’re going to be talking about today here with Kyle. Kyle is going to show us everything that we need to know about the drink rails available with several Color Guard systems. We know you’re going to have questions. We’re going to be monitoring the Q&A and chat throughout the program here. We’re going to answer your questions at the end. So if you have anything, just put it in there and we’ll get right to it. I’m going to leave now because I’m also the cameraman. But Kyle is going to get us started. Kyle, take it away.
Kyle [00:02:19] All right, so. Drink, drink rail is something that we have recently offered, starting about four or five years ago. And as I always like to joke in Wisconsin, where we don’t really need to worry about that because we’re drinking beer, it doesn’t get set down anyways until it’s empty, right? So was a little bit newer concept for me. But with that being said, it’s something that a lot of people are looking for because like, who doesn’t like entertaining out on their deck when the weather’s nice? Not so much in Wisconsin today. We have 19 in snow this morning, so there’s that. So we offer two types of drink rails. One is for a vinyl railing, and we offer that with our Savannah, which is the drink rail kitted version. And we also offer it for our Florence railing. As Tuscany railing kitted drink rail brackets, so for vinyl, we offer several different lengths of railing and two different types – fully kitted for drink rail. For our aluminum railing, we do not fully kit that, so you order our Lincoln railings or our soon to be released Grand Prix railing and you’ll get an accessory package with brackets and hardware inside, and I’ll show you how each of these mounts. I’ll go through vinyl first and then we’ll go through aluminum. But that’s just the difference in brackets. Will require you to trim your post down. OK, so railing height for code is 34″ to 38″ and our posts at the top are 38″. So if you want to do an over the post version, you’ll have to trim your post down. You can also do it between the posts so you can leave the post of the regular height and then you can put your deck or whatever you’re going to use for your top in between. But for this, for this explanation, I’m going to do just a continuous trail over the top. I mean, it’s a lot cleaner look, and that seems to be what most people are doing these days anyway. So without further ado, I’m going to get started. OK. So the first thing I’m going to show you how to do is mount the end bracket for vinyl. So for a vinyl railing, we have two end brackets in the package and five straps on this one is less than six feet. So we’re going to have the two end brackets and then we ask that you put your straps out every two feet. OK, so in this instance, we’re just going to put one in the center, but I’ll show you how to mount. So it’s just a cradle bracket. So cradle like that and then you’re going to take. The two mounting screws. You’re going to take it, you’re going to center it on the post. And then go ahead and run your screw in. So if you notice what I did there, I ran it in and back out and I’m back in again. That’s an installation trick for installing with Patriot Posts. We’ll cover that another webinar. OK, so now that we have our brackets mounted, we’re going to put the trim caps on one for each screw. Most press into place like so.
Eric [00:06:51] Some are easier than others.
Kyle [00:06:56] And the last thing we’re going to do is we’re going to finish off the installation by using our site install screws to finish securing the bracket to the rail.
Eric [00:07:08] So these are the ones with pop caps, right?
Kyle [00:07:40] Pop the cap on and you’re done. OK, when you have a strap. When you have a strap mounted in the center, so we wanted every two feet. I already measure this before and this is less than two feet in between here. So I’m just going to put it right in the center. And then what you’re going to do is you’re going to run these side screws and again on this bracket. Now to the other side, and then that bracket is complete. That’s just a standard Phillips drive the two screws for the end bracket, are number 2 square drive. OK, so now that’s complete. We’re going to go through and we’re going to do it. The aluminum drink real brackets. So like I mentioned before, these brackets will come in the kit, these brackets here and be sold separately. They’re going to be sold as an accessory and they don’t come kitted in a rail section. And so when you go to Mount, these are going to mount one on each one right in front of the bracket and then you get them on every two feet in between for support. So again, I pre-measured it so we’re going to mount one right in the center that will cover us. When you go to install this bracket, you are going to want to pre drill. It’s going to make it a lot easier to run your screws in. Also, good to have two drills, yes, that also helps. Is also take a number two square drive.
Kyle [00:10:30] OK, now we mount the one in the center. So we’re going to look it’s about halfway in between.
Kyle [00:10:44] And we will pre-drill this one as well.
[00:11:01] You screw in and then you repeat the same for the backside. So once we have that done now, we’re going to determine, or we have predetermined, what you want to use for your drink rail topper material. If so, we’re going to we have a deck board we already decided we’re going to use here and then we’re gonna go ahead and do some more pre-drilling. So I’ve got some tapered head screws. To match our brackets, and I’m going to do some pre drilling.
Eric [00:11:49] Making sure, of course, not to go through the top of the board
Kyle [00:11:51] Of course, don’t dril all the way through just enough to get it started.
Eric [00:11:55] And this when you cut on an angle, assuming that there would be another one that would go here.
Kyle [00:12:00] Yes. So I cut this board. I’ll show you the other end in just a minute, but I mitered this end to show you this would be a corner post and you’d continue with another miter and continue on that way to give you a clean transition at the corner. And then there’s another way you can do it when you have a terminal post where you’re terminating the run. There’s another way you can do it to kind of make it aesthetically pleasing as well. With deck boards with live edges, it does get a little tricky, but there are ways to make it look nice if you just take the time.
Kyle [00:12:43] Take my tapered head screws, and I’m going to attach the rail here. So now we’ll do the same. For these other two brackets on the vinyl section. So, I’m going to pre-drill this, just enough to get a start.
Kyle [00:13:38] And then we’re going to go ahead and do the same for the aluminum, so there’s really no difference in attaching deck board, vinyl versus aluminum foil they all hold themselves the same same way. While we’re over here, I can show you the difference, so here’s what you can do to finish off on the end of a termination or a terminal post. You can miter these ends and round this off just a little bit and still gives it a pretty clean look. That way or not just running into a square edge. Just gives it a little bit cleaner look. So I’ll go ahead and pre-drill all three of these the same way. Correct. Just attaches the same way. No real difference there.
Eric [00:14:41] Nice to do one of these outside. Not today,
Kyle [00:14:46] not today, in Wisconsin, today, maybe, maybe down south today, but not not in Wisconsin. Give us a thumbs up if you want us to do one of these in Florida or something. We’ll come down and visit you. I would be glad to. OK. So other than installing the screws on the other side, your drink rail is now complete. OK, so. Again, in Wisconsin, we don’t like to put our beer down. Yes, but no, you don’t have a problem of your drink falling off the rails.
Eric [00:15:20] Yeah, look at that. You can put it to the edge. Oh, in the middle. Cheers. All right. That was nice and easy. Well, you made it look easy.
Kyle [00:15:33] Color Guard makes it look easy.
Eric [00:15:35] Color Guard makes it look easy. Nice Kyle. Nice. All right. Let’s see if we have any questions over here. Sorry for the camera movements. OK, so we do. Let’s see here. So can you install these brackets with picture postmarks? And I believe that we just did.
Kyle [00:15:53] You can. So that’s what I did here. This post in this post are both utilizing Patriot post. The Patriot Post will need to be modified to reach a 36 inch height. Okay, so I just shaved on the post a little bit, modified the fillers inside, with a different mounting hole. Maybe it took me 10 minutes. We as a band saw to trim it down and then covered up the raw edge just to keep it from rotting. So, that is an option. Most of these are installed at with wood posts, but there will be an instance where you are going to run into a Patriot Post installation that can be done. Okay. Same thing here. There are instructions. And here it’s a little deceiving because I’m one of these all at the same height. But typically Lincoln will install a little bit differently than vinyl. I just did it all the same height to keep the continuous top rail here. There’s instructions in the aluminum drink roll brackets on what side to cut this post to. Same thing with the vinyl. OK. There is a little bit different just because of the way the system mounts. This collar goes up a little bit higher than some of our other collars. So I ended up having to trim the baluster shorter just for this display. But, in in the field, you won’t have to do that. There’s instructions on how to mount it if you’re doing an entire aluminum railing system. OK.
Eric [00:17:10] What colors are the clips? The drink rail brackets?
Kyle [00:17:15] At this time, we are offering white only in vinyl. We are in development of tan and clay. But that’s not that’s not going to be until later on in 2022. For aluminum, we offer black, white and bronze the same as our standard really colors look.
Eric [00:17:34] Can you paint the vinyl ones? We always hate to recommend that you could paint the vinyl while in the worst case scenario …
Kyle [00:17:39] You could paint the vinyl. Yes. That’s not something that we recommend, but it is something that you could do in the meantime. OK.
Eric [00:17:48] Right. Oh, this is one I actually seen on the website a lot? How do you match your deck with the deck rail?
Kyle [00:17:58] If you’re doing a retrofit that becomes a little more challenging, you have to remember what type of decking you bought to begin with otherwise are going to buy something close. If you’re doing a typical install like, for instance, here, let’s just say this was a retrofit. OK, so we have a different type of decking down here. What I found something that matches it pretty close, that I mounted up on the top. OK. So that’s something you can do. Otherwise, while you’re having the deck installed, make sure your builder or your contractor orders enough of the material to cover the top of the rail as well. That way everything matches and then you can get all done at the same time.
Eric [00:18:33] OK. The other one I know we get, I don’t think we got this one yet, but what type of screws do you use?
Kyle [00:18:40] OK, so it depends on what material going into. So, in this case, a deck board. You’re going to want to use a tapered head screw in this instance. This is what I used. It’s just the taper head Phillips and you’re going to whatever, whether it’s it’s it really depends on the thickness of your material and what you’re going into. OK. So in this instance, we use the deck board.
Eric [00:19:09] You want to be less.
Kyle [00:19:12] Yes, you want to be in. And of course, you take into account the thickness of the bracket. So you know you’re looking at about there. Okay. So you want to take into account the thickness of your material, and it’s going to need to be a tapered head because all the brackets have a tapered mounting point for attaching the rail.
Eric [00:19:33] All right. So I did see a notification with that one more question that came in. Remember, if you want to ask the question just posted in the chat or you just hit the Q&A. So yeah. Do I have to use deck board? Could I use a piece of live edge lumber as a deck rail?
Kyle [00:19:53] Absolutely. You can use you can use pretty much whatever you want. A lot of people will still do wood decks, especially if you’re in an area where there’s like a lot of scenery, a lot of trees, things like that, you want your deck to look a little more natural. So a lot of folks will still use a wood deck. You can absolutely use the live edge lumber as your top real as well. There’s going to be special treatments for the wood that you’ll want to do to ensure its longevity, but you absolutely can use live edge lumber on there as well.
Eric [00:20:27] OK. All right. Oh, I’ve got no more questions. So we’re going to give everybody a little bit of time back in their day. Kyle, you want to tell us the website
Kyle [00:20:39] Visit colorguardrailing.com. If you have questions or comments, feel free to feel free to send those along as well. Always looking for feedback from everybody. So thank you for attending.
Eric [00:20:48] All right. Thank you, everybody. You got yourself a happy holidays and we’ll be back again with another webinar soon.