Quick Links:
General | Vinyl Railing | Aluminum Railing | Posts and Accessories | Upside Under Deck |ADA Compliant Secondary Handrail
General
Yes, if your stairs have four or more risers, most building codes require a handrail on at least one side for safety. As always, we suggest checking your local code. You can also find more information here https://www.colorguardrailing.com/do-i-need-a-deck-rail/.
For residential decks and stairs, the railing height is usually required to be at least 36 inches, measured vertically from the deck surface. On stairs, handrails should be between 34 and 38 inches above the nosing of the treads. Please refer to your local code for specific requirements in your area. You can also find more information here https://www.colorguardrailing.com/do-i-need-a-deck-rail/.
Yes, even if you’re not required to have your deck inspected, it’s always best to build a deck or railing to code. Building codes are about safety — if someone gets hurt because your deck or railing isn’t up to code, you could be held liable.
The price of railing is determined by a number of factors, including:
- Style and material of railing
- Amount of railing needed
- Add ons (post mounts, gates, caps, collars, post lights, etc.)
Because of this, it is virtually impossible to provide a blanket statement on how much railing costs. We have developed a railing configurator (https://www.colorguardrailing.com/railing-configurators/) to help you build your supply list, then you can take that to your local dealer (https://www.colorguardrailing.com/dealer-locator/) to get an estimate.
Railing should always be considered, regardless of whether there will be children on the deck. Please refer to your local code for the specific requirements in your area. You can also find more information here https://www.colorguardrailing.com/do-i-need-a-deck-rail/.
While you cannot purchase Color Guard products from our website, we have various dealers and online retailers who sell our products. Learn more by finding a dealer.
Our most up-to-date product catalogs are available here – https://www.colorguardrailing.com/resources/.
Yes, our Lincoln product is 100% aluminum. You can find out more here – https://www.colorguardrailing.com/products/lincoln-aluminum-railing/
We are always here to help contractors and DIYers, especially when it comes to estimating projects and product costs. However, because we don’t sell direct, its is difficult for us to provide completely accurate estimates.
We recently launched a new Railing Project Configurator, which allows you to configure your project and develop a supply list for your individual project. For actual product cost, it would be best to take the product list to your local dealer or contractor for an estimate. You can give it a try here.
Information on how to order replacement parts can be obtained by contacting us at 800-832-8914 or by submitting a request online.
Yes, our product is available for resale. Please contact us by using our contact form or call us at 800-832-8914 for more information.
Yes, color samples are available. Please contact Color Guard at 800-832-8914 or reach out to us via our contact page – https://www.colorguardrailing.com/contact/.
Yes, vinyl products have a limited lifetime warranty, while aluminum products come with a warranty for manufacturing defects and defects in materials for a period of 15 years. Restrictions apply. For more information, visit https://www.colorguardrailing.com/resources/#warranty
Color Guard Railings are certified for buildings 3 stories or less in height. Please refer to our compliance manuals for more information Code Compliance Research Report (vinyl) and Code Compliance Research Report (aluminum).
Vinyl Railing
We do not currently offer gates in a bar door style or slides. For all gate offerings please reference our catalog 2024-Literature_LIT-2024_WEB.pdf.
Color Guard vinyl drink rail brackets are sold in our Florence or Key West railing systems or as a separate accessory to our Tuscany or Savannah styles. Vinyl drink rail brackets are available in white only. The actual drink rail material is typically wood or composite and will need to be purchased separately.
Note: Notched or variegated materials are not suggested for a drink rail.
Vinyl straight and stair railings are available in white, tan and clay. We also offer balusters in white, black and bronze for the Tuscany and Verona railings kits. For all colors and sizes available please see our catalog 2024-Literature_LIT-2024_WEB.pdf.
We do not currently offer railings that can be installed on a rounded porch.
Rails can be cut using a miter saw. We recommend using a 10-inch 80 tooth carbide blade for a clean cut. Please note it is important to make sure the lead-in is spaced accordingly and the baluster spacing is even. For more installation instructions, visit our resources page – https://www.colorguardrailing.com/resources/.
Yes, you can install Color Guard Railing into a concrete patio. We recommend using our Patriot Post Mount. Installation will require a masonry drill bit and fasteners (not provided).
Deck posts should be no further than 10 feet apart.
Secondary handrail posts should be no further than 8 feet apart.
Keep in mind that all Color Guard rails are true to length (6 feet is 6 feet).
For both our vinyl and aluminum lines we recommend a mild detergent (like Dawn) and a soft cloth.
We do not recommend polishing railing products.
We do offer a column adaptor for our vinyl railing lines. The rail bracket that comes with your railing would attach to this adaptor to fit a 10-12″ column. Below are the part numbers arranged by color.
We do not currently offer an off-center adaptor for our vinyl railing line.
Our vinyl stair brackets accommodate 23-38 degrees, and our aluminum line can accommodate up to 38 degrees. We have based this range on the standard stair code and guidelines that dictates an angle of around 37° for normal stairways.
No, the adaptor is designed to be used in either direction.
Yes, all Color Guard rails are true to length. For example, a 6-foot rail kit is exactly 6 feet and will fit a 72″ opening. If you have an opening that is smaller than the actual length, please follow our installation instructions on how to cut the rail.
Aluminum Railing
We do not currently offer a column adaptor for our aluminum railing line.
Yes, you can install Color Guard Railing into a concrete patio. We recommend using our 2” aluminum surface mount post (Aspen only), 3” aluminum surface mount post, our aluminum Sentinel Structural Porch Post or our Patriot Post Mount. Installation will require a masonry drill bit and fasteners (not provided).
No, aluminum doesn’t rust like steel does. It’s naturally resistant to corrosion, plus our products are coated to resist corrosion, which makes it a great choice for outdoor use. Installations within one mile of where the atmosphere is influenced by bodies of salt water or other contaminant conditions will be limited to one year warranty against cracking, chipping or peeling.
Rails can be cut using a miter saw. We recommend using a 10-inch 80 tooth carbide blade for a clean cut. Please note it is important to make sure the lead-in is spaced accordingly and the baluster spacing is even. For more installation instructions, visit our resources page – https://www.colorguardrailing.com/resources/.
Deck posts should be no further than 10 feet apart.
Secondary handrail posts should be no further than 8 feet apart.
Keep in mind that all Color Guard rails are true to length (6 feet is 6 feet).
We do not currently offer railings that can be installed on a rounded porch.
For both our vinyl and aluminum lines we recommend a mild detergent (like Dawn) and a soft cloth.
We do not recommend polishing railing products.
We do offer a column adaptor for our vinyl railing lines. The rail bracket that comes with your railing would attach to this adaptor to fit a 10-12″ column. Below are the part numbers arranged by color.
Color Guard aluminum drink rail brackets are sold as an accessory for our Lincoln or Grand Prix railing systems. Aluminum drink rail brackets are available in Black, White, Bronze, and Slate Gray. The actual drink rail material is typically wood or composite and will need to be purchased separately.
Note: Notched or variegated materials are not suggested for a drink rail.
We do not currently offer gates in a bar door style or slides. For all gate offerings, please reference our catalog 2024-Literature_LIT-2024_WEB.pdf.
Yes, extra brackets can be purchased from your local dealer. Lincoln bracket kits include a full set of railing brackets (two top and two bottom). For more information on the Lincoln Railing System, visit https://www.colorguardrailing.com/products/lincoln-aluminum-railing/.
Aluminum straight and stair railings are available in black, white, bronze and slate gray. We also offer a black and white combo for the Lincoln aluminum line. For all colors and sizes available, please see our catalog 2024-Literature_LIT-2024_WEB.pdf.
Our vinyl stair brackets accommodate 23-38 degrees, and our aluminum line can accommodate up to 38 degrees. We have based this range on the standard stair code and guidelines that dictates an angle of around 37° for normal stairways.
The first two drink rail brackets should be placed beside the top rail brackets at each end of the rail. Additional Drink Rail brackets should be placed at 2 foot intervals across the top of the rail.
For more installation instructions, watch this video.
Yes, all Color Guard rails are true to length. For example, a 6-foot rail kit is exactly 6 feet and will fit a 72″ opening. If you have an opening that is smaller than the actual length, please follow our installation instructions on how to cut the rail.
Posts and Accessories
A post is a structural element of the deck, usually made from pressure treated wood or metal. It could also be a surface-mount post system like out Patriot Post Mount.
A post sleeve is a vinyl or aluminum covering that slips over the post to give it a certain look. It is purely for aesthetics and has no structural qualities.
We do not recommend painting Color Guard products. Painting will void our warranty.
We do not currently offer caps or collars for the 2×4 vinyl post sleeve.
Our Smooth and Fluted post wraps install in a few easy steps. Detailed installation instructions can be found here
We do offer a 2×4 vinyl sleeve, which you can find on page 10 of the Color Guard Product Price List. Keep in mind, our 2×4 vinyl sleeve is designed to fit a nominal fir, not treated/twisted wood. If you use treated/twisted wood, the 2×4 will need to be planed down to fit the vinyl post sleeve. We do not offer a 1×4 sleeve.
We do not currently offer hard-wired lighting. All our light options are solar and use specific rechargeable batteries.
The Patriot Post Mount can be installed into wood, concrete or composite surfaces. That said, we do not suggest securing the Patriot to deck boards alone. We recommend using blocking attached to the deck framework, so the post is being secured to something more structurally sound than just the deck board.
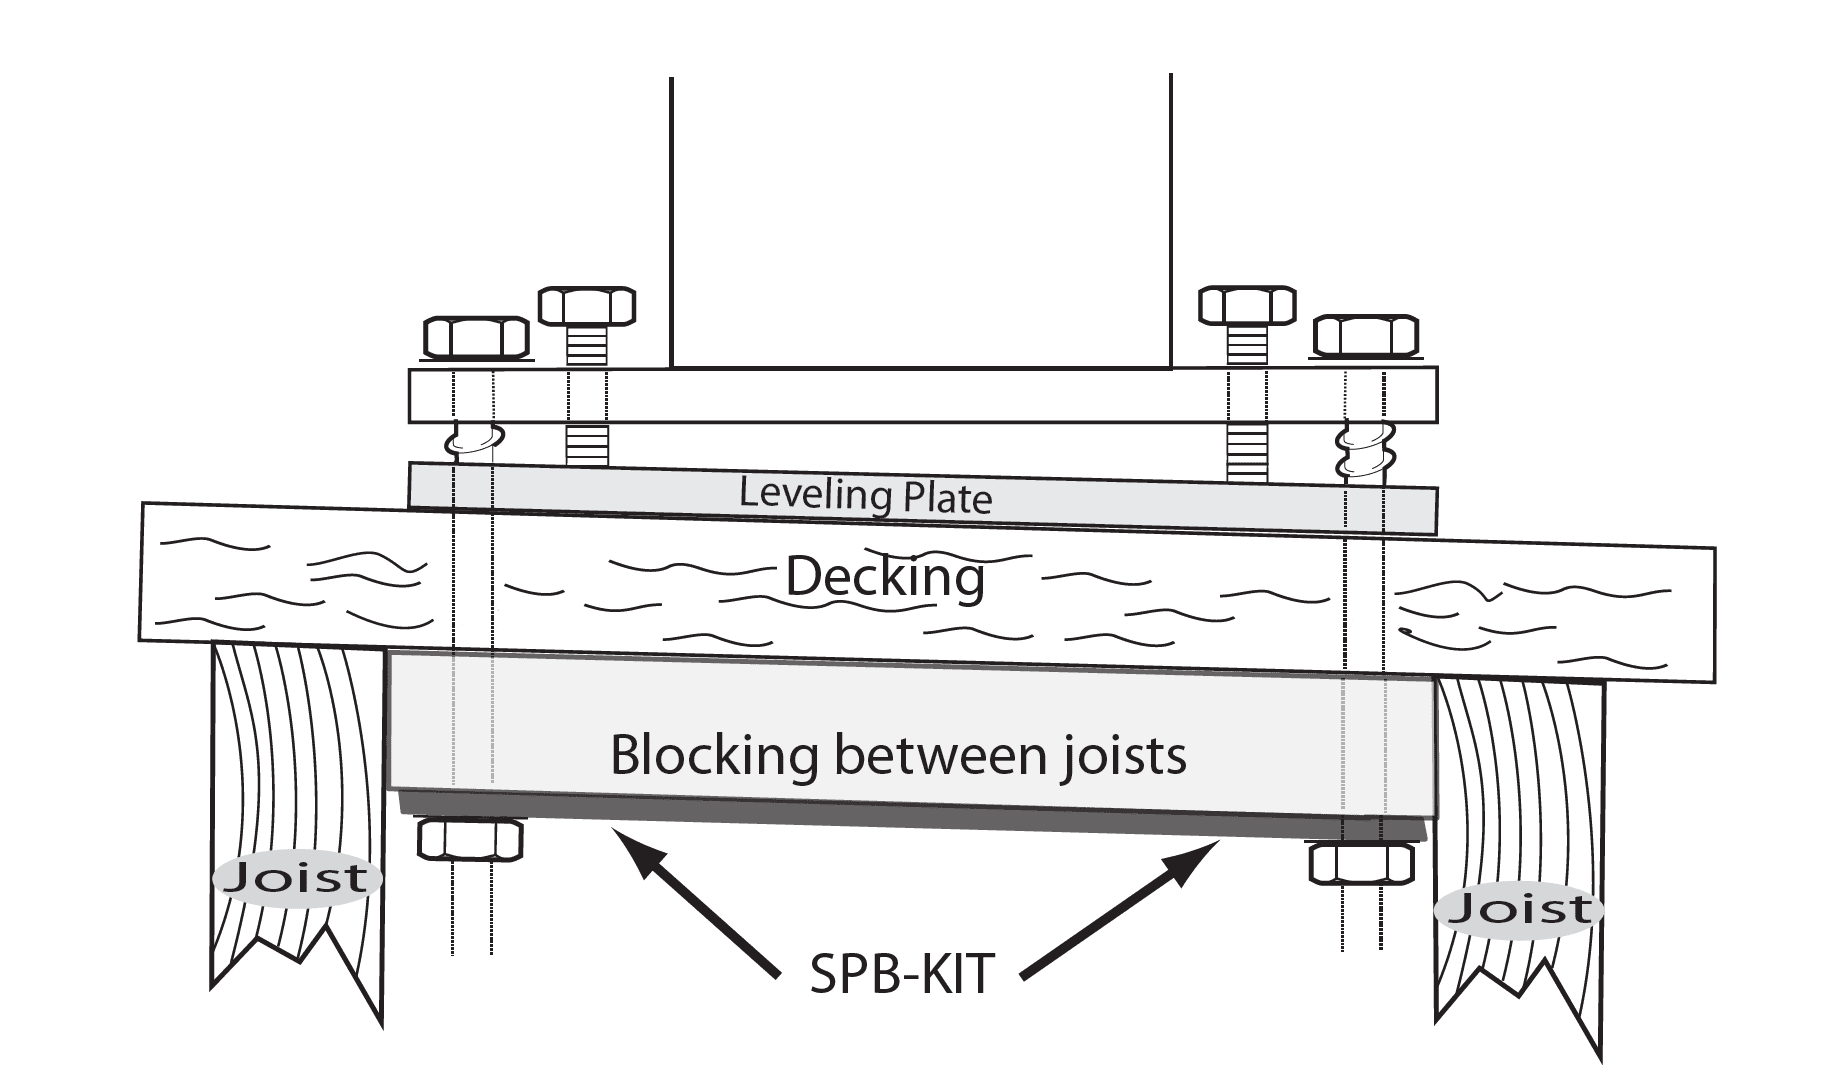
We also do have the SPB Kit/Underdeck Anchoring Plate available for added stability. You can find that here.
The Patriot Post Mount can be leveled up to 11 degrees in any direction. To do this, secure the post with the fastening screws, but don’t tighten all the way yet because the post still needs to be leveled.
To do this, secure the post with the fastening screws (not included), but don’t tighten all the way yet because the post still needs to be leveled.
We have an installation video on this page that will walk you through the process – https://www.colorguardrailing.com/patriot-post-mount-installation/
You use the same filler for both the 36- and 44-inch sleeves.
Using the pre-drilled holes, attach the fillers. For a 36-inch post sleeve, attach the fillers in the downward direction.
To install a 44-inch Sleeve, simply attach the fillers in the upward direction.
We have an installation video on this page that will walk you through the process – https://www.colorguardrailing.com/patriot-post-mount-installation/
Upside Under Deck
Yes, recessed lights can be installed. We recommend following the installation instructions of the individual products you are installing along with the Ceiling Fan/Lighting/Speaker installation guide https://www.colorguardrailing.com/wp-content/uploads/UPSIDE-FAN-INSTR.pdf. You will need to use an outdoor rated sealant/caulk to seal around the fixture to prevent water from getting in.
Unfortunately, we do not currently have a splice to extend the length beyond 20 feet.
The Upside gutter will go behind the trim board. Please reference our installation instructions for additional guidance. This document can be located at https://www.colorguardrailing.com/s/UpSide-Deck-Ceiling-Installation-Instructions.pdf
We recommend following the installation instructions of the individual products you are installing along with the Ceiling Fan/Lighting/Speaker installation guide https://www.colorguardrailing.com/wp-content/uploads/UPSIDE-FAN-INSTR.pdf.
Please note the Upside Under Deck Ceiling System is not designed to support the weight of ceiling fans, large lighting fixtures, swings and other add-ons. These things need to be attached directly to the deck joists and/or supported using the proper mounting hardware.
A few more tips:
- Use an outdoor-rated electrical box and follow all local building codes
- The channels are 6″ wide, so plan ahead to mount the fixture in the center of a channel. Keep in mind when locating your fixture, that our ceiling
system does not start or end on a full channel. This will affect where the channels line up in relation to your fixture. - Do not cut at the seam where channels join, it will cause leaking.
- Once you have the channel mounted around the fixture, you will need to use an outdoor rated sealant/caulk to seal around the fixture to prevent water from getting in.
Even though the vinyl channels lock into each other during installation, it is possible to remove a panel if needed. It will be challenging to remove once the gutter is installed; however, it can be done by starting at the gutter end and separating one channel from the next, working your way back toward the house.
ADA Compliant Secondary Handrail
ADA ramp angles may vary by location and application; however, a standard ADA ramp is a 1/12 pitch or approximately 5 degrees per code.
As with any project, we always recommend checking your local building codes and guidelines. Color Guard offers vinyl and aluminum (Speedstair) stair brackets that can accommodate angles from 23-38 degrees. We also offer an aluminum adjustable bracket option to accommodate 0-38 degree angles.
The elbows are preformed pieces that cannot be modified without the risk of damage. We do not recommend bending or straightening them.
You can find all the installation instructions to meet requirements at https://www.colorguardrailing.com/s/IN-42_AluminumSecondaryHandrail.pdf
The maximum recommended spacing is 8 feet and we recommend that there should be 1 bracket in the middle of an 8 foot run. For more information, please see the installation instructions – https://www.colorguardrailing.com/s/IN-42_AluminumSecondaryHandrail.pdf