When it comes to our Premium Vinyl Collection, Color Guard offers a number of vinyl bracket options. But which one is right for you? In this lunch-and-learn webinar, Color Guard’s Kyle Blindauer will show you what types of vinyl brackets Color Guard offers, give you a brief overview of installation, and discuss the benefits and typical uses of each model.
Transcript
[00:06] Eric: Hi everyone and welcome to our first webinar, Bracketology, where we’re going to talk about vinyl railing brackets, and the benefits, and show you a few examples. My name is Eric, I’m the moderator slash camera guy, so you’re not going to see me at all. This is Kyle. If you’ve ever contacted Color Guard for some advice on how to install something or you’ve watched some of our how-to videos, you’re familiar with Kyle and his work.
So today Kyle’s going to run us through some of the common vinyl brackets and adapters, and if you have any questions just throw them up in the q a or in the chat and we’ll get to them at the end. Kyle, take it away.
[00:46] Kyle: All right, so like Eric mentioned, I’m going to go over our different styles of brackets, different types of brackets and a lot of the benefits and features regarding
those brackets.
So, first thing I’m going to start out with is our straight rail brackets. So our straight rail brackets — first before I mention anything else, I’m going to say that our railing sections are fully kitted, so when you order a section of our railing, the rail brackets come in the package, okay? And how they’re going to come in the package is like this, so you get a pair of — for for this example, it’s classic railing, so you’re going to get a pair of these, a pair of these, as well as a bag of stainless steel hardware and color matching caps, okay. So that’s going to come in your rail section. If you are cutting a section down, that’s the only time you would need to order additional rail brackets, okay? And just one thing to keep in mind regarding that, if you’re cutting a section down, make sure you give yourself at least six inches, because if you take an eight-footer and try to make two fours of it, it’s not going to work. The spacing just doesn’t work out because of the initial lead [?].
[1:48] Okay, so regarding that, straight brackets — again I’m going to go
over some things that make these easy to install. We understand that help is hard to find these days and your contractor’s time is more important than it ever has been before. So I’m just going to point out some things that make our brackets easier to install and quicker to install. So top and bottom bracket on display here, and once you once you have your railing cut to length, you just put your railing bracket up to the post and you run your four [?] steel and steel screws in. Those are square drive screws, and if you’ll notice on the bottom rail here, and I can show you on this loose bracket here, on this bracket you’ll see that there’s some some angles on there. The reason why we do that is so when you’re laying on the deck, you don’t have to try to get your truck underneath here, you can come in from the side and run that screw in, and that
saves you time, that saves you damage to the rail. Again, just one of the little, tiny things that we do to try to make your job a little bit easier.
[2:55] Some other things I want to mention is, you won’t want to overtighten your brackets, so with them being vinyl brackets there isn’t unlimited amount of give. So at some point you’re going to snug it up, but you don’t want to go too far because if you put added pressure on the bracket, you could potentially cause damage to the bracket and cause it to fail. So you’ll just want to snug it up to the surface and not use a hammer drill and not just just run it all the way in there, you don’t want want to indent it in the bracket, just again snugging it up.
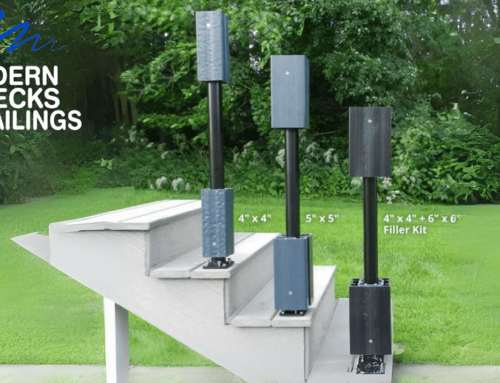
[3:28] So one other, one other install tip that I’m going to give you, and you can see it in our install video for a patriot post, which we’ll cover the patriot post at another time. But if you are installing in a patriot post, which, our vinyl sleeves can go over wood or the surface mount posts that we offer, called the patriot post. When you’re running the screws in there, those final fillers that help fill out the post, they’re going to want to pull against this post sleeve and push the post sleeve out. So as you’re running your screw in, you run it about halfway, and then you’re going to back it out to relax that post sleeve, and then run it in the rest of the way okay. Again, not, being sure not to overtighten it, just snug it up, okay.
[4:08] Another thing I want to touch on is a unique feature to our vinyl rail brackets, they accommodate a 112 pitch, so you can use them on a straight rail section for a handicap ramp. As you can see, there’s a little bit of an adjustment built into this bracket, not enough pressure on there to be detrimental to the installation, but enough to get you to your 112 handicap ramp pitch. Okay, I think that’s about it for straight brackets. I’m sorry, no it’s not. One thing you’re going to — the last thing you want to do once you
have your screws installed, before — you can snap your covers on and all that, but
one of the critical things to installing our railing is our side screws, and you can see that on our display right here, that has them installed already. That’s what gives us our IRC and IBC code approval rating. So it is critical that those side screws be installed, there’s little hinge caps that help conceal them that are color-matched to your railing, and that’s the finish to installing our brackets there.
[5:13] Okay, moving on to our stair rail brackets, which are on the other side of our post here. Again, every stair section that you buy is going to be fully kitted, you’re going to have all the rail brackets you’ll need for your installation. You’ll get two tops and two bottoms — and I’ll go over the different styles of railing in a few minutes here, but again, this one’s for classics, so you got two bottom brackets here, two top brackets here, you’re going to have color-matched caps that are in there and a package of stainless steel hardware, okay. When installing your stair railing, again you’ll notice that the bottom of the brackets both have an angled taper to them. Again, for ease of installation. Stairs are one of the most challenging railing installations, and it’s not always easy to go straight in at the bracket. So we offer, we sell our rail brackets with angles on there to make it easier for you to go in a little bit from the side so you’re not
digging up the rail, you’re not have you know having any other issues regarding that, you’re going on an angle from the side and and finish off that installation. So one of the unique things about our rail brackets is that you don’t have to miter cut the end rail, you have this straight cut here, insert it in the bracket and it gives you a 23 to 38 degree range. Again, one of the easy, one of the things that makes it easier to use our product, having that range so you’re not set within a tight window, 23 to 38 is a pretty generous angle range. So whether it’s a remodel or a brand new installation, this product will work for what you’re, what you’re going to need it for. I’m just going to show you how our railing brackets fit over our rail. So this is this would be a square bottom rail, and as you can see here — I’ll give you a little bit of a demonstration on how that angle works. So as you can see, it moves around back in behind there, and so your post is right there, and that gives you your range of motion there, okay. Same thing with the top rail, top rail slides in here, no need to miter it or anything like that, and you get your range of motion there, okay. Just one of the things that makes our product unique and helps you save time and effort on the job site
[7:43] Moving on to our drink rail brackets, our drink rail brackets will be fully kitted as well. If you buy our Key West or Florence railing systems, you’ll get a package with two of these brackets in there, and five of these, along with the hardware. And then in addition to that, you’ll get two of these. So the key, which includes the covers and the stainless steel hardware color-match. So one of the key components of that is on our Key West or Florence railing, is both the top and bottom rail are square in shape. They’re two by three in shape, okay. So how the drink rail bracket works is, it’s going to install flush up against your post like that. And this is like a cradle, so your rail sits in there, you mount the side screws to the side in these pre-drilled holes. And then after you’ve attached it to the post already through these holes here. And then the only hardware that we don’t provide is the hardware that goes up into your deck material, so as you can see that’s a tapered hole here, so that’s the only hardware that you’ll need to source is a screw that’s long enough to go into whatever material you’re using, whether it’s a deck board or cedar or whatever you choose to use for your topper there, okay.
[9:12] So, I’m going to quickly go over the different styles of railing. Okay so I’m going to go over the first style, which is a tapered top rail and two by three bottom rail. And that’s going to come in classic, architectural or Verona railing, all right. Your hand can still fit around the rail like this, it’s not technically considered graspable, but your hand can still fit over it and you have a square bottom rail here okay? So that’s classic, architectural and Verona railing.
[9:39] Now if you order our Savannah, Key West, Florence or Tuscany railing, you’re going to get a railing kit that’s got all your brackets and everything, but two two by three rails, instead of the tapered rail. So you’re going to have one as a top rail and one as the bottom rail. Some of the rails will have a square hole routed in here for our vinyl balusters, or for Tuscany and Florence railing you’ll have round holes in it, okay?
[10:14] Moving on to some of our accessories. We offer three different types of accessories, again to accommodate — everybody’s got unique decks nowadays, nobody— everybody’s looking for something other square, not everybody has a square deck. So we offer some different options to help accommodate those different angles. So first thing I want to start with is a 22 and a half degree angle. And we offer a straight and a stair version. And so to mount your straight rail, you’re going to measure up based on the distance of your under rail spacing — so we offer railing sections in two inch spacing and four inch spacing. Okay, so for your two inch spacing you’re going to measure up an inch and three eighths, and if you have four inch spacing you’re going to measure up three and three-eighths okay. Once you have that location figured out, and you have it mounted, you can go ahead and mount your brackets. So if this was the bottom rail here, you mount your bottom rail and then, if you notice here, there’s little pins on the top and bottom of this bracket, of this angle bracket here. So what that does is it helps locate where your bracket’s going to mount, so you’re not mounting it like this or like this, it’s going to be nice and straight and square, gives you a professional-looking installation, and easy to do.
Okay so to finish your angle bracket installation, you mount your bottom rail, attach your baluster — attach your bracket — and then you start putting your balusters in. And then put your top rail on top of your balusters, and that’ll help you locate the top rail okay. Then you put your top rail bracket up to the installation like so, let the pins locate where your bracket mounts and then finish off your installation, run your four screws in, put your caps on, run your side screws in, and you’re finished, okay.
[12:12] Same thing works for the stair installation. So, you have to follow the stair installation instructions to find out where your stair brackets are going to mount. Once you have those mounted, these locating pins will help you center your bracket in the opening to mount and have a square nice clean installation, okay.
[12:36] Another option that we have is the 45 degree angle. And unlike the 22 and a half that mounts to the face of the post, the 45 degree angle mounts off the corner of the post okay. But again you’ll notice that we’ve got a straight and a stair version, and they all have those little locating pins on them to help make your bracket installation easier. So once again you just set your bracket on there, and you’re not mounting it like this or like that, those locating pins help square up your bracket installation and a nice, clean, professional-looking installation with minimal effort.
[13:25] Last but not least we have column adapters. And once again you’ll notice that we’ve got a straight and a stair version. And i’ve mounted those to our square post here, but they do fit a 10 to 12 inch round column. If you have something that’s a little bit bigger than that what you can do is take 100-grit sandpaper and mount it to the face of the column, and then run the bracket over the top of that to get the profile that you need, okay. Once you have these mounted, once again you’ll notice that there’s little locating pins to help you locate where your brackets can mount so you get a nice square installation, and we offer those in straight and stair versions.
[14:06] Eric: All right, well that brings us. I’ve got to set the camera down here because I’m also the cameraman. That brings us to our Q and A portion of this. Again, if you just want to throw your questions up using the Q and A button or in the chat, we’ll get to them in an orderly fashion. And I do have a couple already here, let me just look those up. Oh here’s one. “Key West and Florence drink rail brackets, do they work with
the vinyl angle adapters?”
[14:38] Kyle: That’s a great question actually. So I’ll show you an actual installation here. And while they line up with the locating pins, the problem with using our Florence or drink rail brackets — Key West drink rail brackets here — is that your deck board is going to run up against this angle bracket here. So you could possibly terminate your deck board there, but in addition to that, the rest of this bracket doesn’t fit flush up against the back of the angle bracket, so you’ll have to get a little creative when you have angles with your drink rail. You can try to try to use this setup or come up with something a little more creative than that, but unfortunately, for a drink rail bracket doesn’t quite work with our angle adapter brackets at this time.
[15:33] Eric: Okay another question here, “Do you make drink rail brackets in tan or clay?”
[15:39] Kyle: That’s another great question so I’ll go back to my drink rail bracket here. We only make them in this white, okay. So in our vinyl sales numbers, tan and clay are about five to eight percent roughly, each, of our total vinyl rail sales so it’s just not enough to create different colored drink rail brackets at this time.
[16:01] Eric: Okay, now here’s one, “How do you remove the plastic covers at the top and bottom of the brackets?”
[16:07] Kyle: That’s another great question. Okay, so what I suggest doing is, once you have your cover installed here, you need to get it back off, I lift up on this corner of it, take a flat blade screwdriver — I’ve got a really long version here, hopefully you’ve got a shorter one — and just pry up at this corner. Now, I’ve been doing this a while so I’m going to brag a little bit, I didn’t snap any of the any of the pins off of here, okay. But more than likely you’re going to end up snapping some off. That’s the case, you can order replacements through your local dealer or screenporchliving.com.
Now when you go to put one of these covers on, I’ll show you right away since I have this off, it’s really easy to install. Low pressure in the center once you have it located, centered on your bracket, and it’s installed just like that.
[17:02] Eric: Alright. And you go over this stuff in your installation videos that are on colorguardrailing.com, right?
Kyle: Absolutely, absolutely.
Eric: Alright, super. Okay. Real high-tech operation we got here. That is pretty much it, we don’t have any more questions today. Thank you everyone for joining us. Again, if you want to find out more information on color guard visit us at colorguardrailing.com. And Kyle, thank you for sharing your expertise today.
Kyle: Thanks for joining us guys.
Eric: Alright thank you guys and have yourself a great day. [17:40][End]