Color Guard Aluminum Railing is the professional’s choice for porches and decks that stand the test of time. Engineered for durability and designed to add style to any outdoor living space, our aluminum railing is easy to install for both professionals and DIYers alike.
That said, we do have several hacks to make installation even easier. These secret tricks of the trade will be the subject of this program – (At Least) 5 Aluminum Railing Tips and Tricks
During this presentation, Color Guard’s resident expert, Kyle Blindauer, demonstrated at least 5 WAYS you can make installing Aluminum Railing even easier, including:
-
- Getting the right cut every time
- Correctly matching baluster holes every time
- Covering up nicks and scratches
- Removing an extra baluster hole
- Planning for caps and collars
- And more!
If you’re planning to install Color Guard Aluminum Railing anytime soon, you’ll want to watch this!
Transcription
Eric [00:00:04] Surprise, it’s 11 o’clock. Hey, everyone. How’s it going? And welcome today to today’s Color Guard webinar, and today we’re going to be giving you five tips or tricks for aluminum railing. We pride ourselves, obviously, on having the easiest to install deck railing systems on the planet, on the planet. But there’s still a couple of hacks that you could do to make it a little bit easier. Make the job flow a little bit smoother. And Kyle, here is going to be your guide. Now, Along the way, you’re probably gonna have questions, and you can ask those using the chat or the Q&A at any time, and we’ll get to those at the end of the presentation. And these tricks and tips today will apply to all of our aluminum lines, which are the Aspen, the Lincoln and the brand new Grand Prix, which if you haven’t seen that yet, check out our website. All right, at this time, I’m going to turn over to Kyle because he’s the guy who knows what he’s talking about, and I just run the camera.
Kyle [00:01:06] Good afternoon, everybody. So I’m going to go over some really easy things you can do to make your railing installation, for aluminum railing, out really go just a little bit smoother. Some of them are in the installation instructions, we’re going to do them anyways, but it’s all just real, time saving and uh, and effort saving things that you can do.
Kyle [00:01:33] So I’ve got a four foot bronze railing section here, and the first thing that I’m going to di is lay it all, so you get a good cut every time. OK, so the first thing I do when I install railing is I’ve got two two-inch support blocks that I cut out of wood. You can cut them out of composite – whatever you got lying around on the job site and I’m going to put those underneath the bottom rail. That’s going to give me my spacing. So our aluminum railing works on a two-inch only spacing. OK. You can do other spacing than that, but you have to modify the railing, cut down the balusters, etc. So a standard installation is a two inch bottom rail space. OK.
Kyle [00:02:25] Now that I’ve done that. We’ll just say I’ve got my I’ve got my spacing and figured out I’m going to go and mark where I need to cut. I’ve got my two inch spacing under here figured out. I’m going to use a square and I’m going to mark right along my square. That’s going to get me a flush with the post. Now when to go to cut, I’m going to cut right on that line. I’m not going to side to side of it. I’m not going to cut to the inside of it right on that line. That’ll give you enough clearance between your posts, assuming they’re straight and plum that you won’t hit the post as you’re inserting a railing into the opening. OK, so that’s just one simple hack. Um. That would give you a nice, clean mark, and then what I do is I turn it over on my side and then I’ll use a square and I’ll finish it off on the side.
Kyle [00:03:24] To go along with that, there’s a couple of other things you can do, though I’ll give you a nice, clean cut and a nice balusters alignment as well. So all railing sections, the inserts kind of shift around a little bit, right? So what we do is I line it up on the end and then got some kind of tape. It can be electrical tape, it can be any kind of tape your have on a job site. I just happen to have a strap tape here. I’ll take a small piece and in the center of a section. Now, obviously, if you have longer sections like a 10 foot or you’ll want to do it two or three of these throughout the length of section help keep it in place. But on a four footer, you’ll need one right in the center and wrap it around and make sure it’s snug and tight. That way my insert isn’t going to move anywhere. OK? And do that on your top rail also. The insert moves. So we’re going to take a small piece of tape and just prevent that from moving.
Eric [00:04:37] Two cents of tape saves about a thousand dollars worth of frustration.
Kyle [00:04:42] You don’t have to go back to your dealer order a new section of railing or order an insert or anything else because the insert shifted and you cut it wrong. Okay, so that’s just something really simple that you can do.
Kyle [00:04:54] Moving along with that, once you have that taped, the next step that I’m going to do is I’m going to figure out where my hole spacing is. So right now, you can tell it’s really not very even. So I’m just going to take a tape measure. I’ve got about four and a half here. I’ve got like five and a half here. So there’s a couple of things I can do. I can start out by putting one in straight up against the post and see what that spacing turns out to be. It gives me about three that gives me about two and a half. Okay, so that’s not going to work. So now I’m going to do what I call taking a hole out. OK? We hinted at this in one of our install videos, but we didn’t really didn’t really illustrate it completely. So I’m going to go over that right now. So what I’m going to do is I’m going to take this hole, and I’m going to shift it out of view. Now we’ve got holes here. Again, the spacing isn’t very even. So, I’m goint ot shift it just a little bit, and I’m going to move my block, so they work along with me here. And we’ll just check our spacing out here. So I’m about two and three quarters and two and a half, so I’m going to split the difference. Yes, and I’m in about two and five eighths and I’ll double check this side. Just a hair too far, back this up just a little bit. And our holes are evenly spaced now. Yeah, so like I mentioned before. I take my square. I’m going to mark my rail. On both sides up against the post, I’m sure that I have a square cut. OK. And. I’m going to go ahead on while I’m at it, I’ll take my square and finish off the line all the way down the rail.
Kyle [00:07:17] Now that I have that done. Another trick that I like to use that will make sure that you can cut both rails at the same time and make sure they stay aligned. Since I’m taking a baluster out, I going to have a baluster left over from the process, right? So what I do is I cut a little – lets verify the size of it – two inch, two inch piece of baluster here. And I will put that again right in the center, and then I’m going to take my rail and insert it, so now my mark is right there on both sides, and I’m ready to make my cut. I can cut both rails at the same time.
Eric [00:08:11] And they’re both going to be the same length.
Kyle [00:08:14] And they will both be the same length. So again, assuming that your balusters are true and plum you’ll have no issues assembling your railing sections. Still using your blocks and putting the whole section into your opening – like so.
Eric [00:08:31] Wow, it installed just like that for seconds, just like that.
Kyle [00:08:37] We are easy, but not quite that. Not that easy. OK. OK.
Eric [00:08:40] And for cutting it, you guys recommend a certain type of blade.
Kyle [00:08:43] Yes. 80-tooth carbide blade. That’ll give you a nice clean cut without a ton of chips or anything, any kind of blocking or anything like that. I’ll give you a nice smooth – it’ll cut like a through like a hot knife through butter. All right.
Kyle [00:08:58] Once you have it cut, you might be worried about maybe nicking up the finish or anything like that. We do have a durable powder coat on here, but um, you know, if it comes up against a metal blade, let’s say bump on the saw blade or something along those lines, you might have an nick. We do offer touch up paint, because as we see in our install videos, chips happen. So one for each color, black, white, bronze item numbers are on there, too. So in case you have any questions on what to order for touch up paint, the numbers are right there. And they are color matched right to our PVG powder coat, so there are nice clean match, you can do that even if you’re as you’re installing your screws and even get dinged up a little bit, just roll a little dab in there won’t even notice the ding is there.
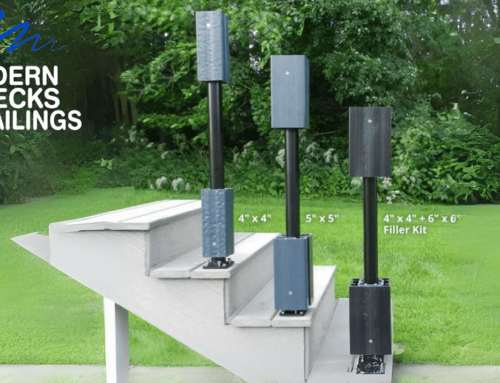
Kyle [00:09:53] When planning for caps and collars our railing. We sell post along with our railing and our posts, our thirty seven, forty three and forty nine inches tall. Okay, so each one of those heights of posts accommodates the two inch clearance and a thirty six inch high rail for 37 43 inch posts accommodates a 42 inch high rail and a 49 inch post accommodates any stair installations like you may here, OK, including our 42 inch stair. All right. So we give plenty clearance for the caps and all those cases, depending on your installation, every installation is different. You may have to cut the post down to get a to get a little bit better look if you’ve got your stairs, depending on the angle and things like that with our forty nine inch post. But for a standard installation, straight or stair our 37 and 43 pair very well with our 36 and 42 inch high rail. OK, so as long as you’re using those two inch spacers already there, you can see where I had the previous section from the from the drink real episode last time. That’s plenty of clearance for your collar, about two inch spacing underneath.
Eric [00:11:08] And if you happen to miss the drink rail episode that is available on our website.
Kyle [00:11:12] https://www.colorguardrailing.com
Eric [00:11:13] That’s right.
Kyle [00:11:14] All right. Last but not least, I have a bonus tip. So when you order our posts, they come with the cap and collar inside as long as as well as the leveling hardware. The only thing they don’t come with the fasteners to mount it to your substrate. But the cap and collar come wrapped in a foam like this. OK, now even if you don’t order our posts, you may be using existing posts or whatnot. There’s always some kind of material around your job site, whether it’s a cardboard box or something along those lines that you can use when you’re when you actually go to install our railing. So let’s just say I’m ready to install our railing. We got our section set up and I want to start running a screw. And now with this bracket, you’re getting pretty close to the rail here, right? Now, everybody’s drills and stuff are a little bit different. Everything varies in size and shape and whatnot. But if I’m concerned at all about hitting the bracket or the rail, I’m going to wrap that form around and I’m going around my screw. OK. So that’s your bonus tip. Utilizing materials that are already on your job site without having to purchase, you know, some other kind of protective material, anything like that. I just use something that’s already existing in our packaging and that’ll help save you some extra dings and marks on your rail.
Eric [00:12:38] Yeah, and everybody’s got that stuff, that styrofoam sheet stuff lying around. We’ve all ordered packages. Yeah. So when it comes to aluminum railing, what’s the most difficult part about the installation?
Kyle [00:12:52] The most difficult. Really is laying out your length. Especially on a straight section, so making sure that you got your dimensions properly, making sure that you got your baluster spacing laid out like I showed you before. The most critical thing, and you may not see it until you’re done, with the install as you step away and say, Look, am I going to result? And then your balusters are not centered in the opening. It feels they’ll stick out like a sore thumb every day after that. So the most critical and most sort of, I guess, difficult if you want to call it that. Part of the installation to me is making sure that your baluster spacing is equal on both sides is always, at least for me. it sticks out like a sore thumb. I see it all the time, so I’m not sure that I really. But with other installations that I go and see it, there out in the neighborhood. I can tell if something looks out of whack. So to me, that’s the most important part as far as the stairs, the stairs. The most tricky, trickiest part is locating your brackets on the holes. So again, that just takes a little time and patience as it goes along with laying out where your balusters holes line up. That’s going to that’s going to play into that as well. But other than that, we’ve done with our in-store videos, with our revision of our instructions. We’ve done a lot of things to make our railing as easy to install as we can.
Eric [00:14:22] OK. All right. So I know this isn’t in the script, but … script. The piece of paper with some notes on it. The new Grand Prix. How does that differ from the other products, other aluminum railing?
Kyle [00:14:37] Yeah. So I’m really excited about our Grand Prix. We get a lot of requests for this, along with lake houses and stuff like that. so our Aspen railing has … I’ll differentiate all three of them. So our Aspen railing comes in black only, so bronze won’t apply to look. It’s going to have this as a bottom rail and this is a top rail with round balusters. OK, so instead of a square insert, you’ll have rounds inserts for round balusters. OK? The Lincoln is what I’ve got right here, and that’s that’s actually that section right there, and that’s going to have a bread loaf style top rail square inserts, square balancers and square bottom. OK? The Grand Prix uses the same bread loaf of top rail, same square bottom rail with round inserts and round balusters. I can’t tell you how many requests we’ve gotten for that style of railing on lake houses, houses with a view. The round really, really at least perception wise, allows you a better, better look at your view so you don’t look like you’re in a jail cell or you know the way when you’re looking in your lake, you don’t want to see your balusters, right? You don’t want to see your rail, you want to see your view. But you need to be safety cautious, or safety conscious as well. So code requires you to have a railing, but we do everything we can to help ensure that we can preserve that view off of our deck and enjoy your outdoor living space.
Eric [00:16:04] Yeah, yeah. We’ve got some great pictures of it on the website and we are going to have an installation video at some point in time, and that’s coming soon. We are shooting some new installation videos today, just why there’s a whole bunch of stuff in the room here. So those will be coming very soon, as well as one on the new Grand Prix. And that’s also if you guys doing the road show this summer?
Kyle [00:16:27] Yes. Okay. The road actually is just getting started down in Tennessee. We just sent one of our trailers down there last week, and the other one will be out on the road shortly. But just to let you know where a grand prix is available, it is ready to order and we have it in stock so we can ship with your distributor after two weeks.
Eric [00:16:44] Awesome. Awesome. Okay. Now we’re at the point about a Q and A. We don’t have anything right now, so this is time for you guys to ask your questions and. Sorry, if the screen is getting wonky here, but I’m holding a camera in one hand and checking the check in the other. So I’m going to ask just a general question to kind of get things started. Let’s say you’ve got your typical normal sized deck. I know there probably isn’t one, but you know, length of the house. How long is it going? Realistically, how long is it going to take to put the aluminum railing up?
Kyle [00:17:19] But let’s just say, let’s just say a 10 by 20. OK, if I’m going to sell their product before, have you ever install one around before? If you’re your DIY, you’re just doing it on your house for the first time, that might take you a good portion of the day. OK? Take your time. You walk through everything, go slow and start going into a rhythm. Then I’ll take you a good portion of the day. And now for somebody that’s more experienced, you should be able to do it in an afternoon. Five or six sections and posts get granted on your deck is bare and ready to go. You have to remove any posts or anything else. Just moaning our posts and then putting the railing off, you should be doing an afternoon.
Eric [00:17:59] OK. All right. And can it be mounted to existing posts? Let’s say you’ve got something, but it’s old.
Kyle [00:18:05] Sure. Yeah. So as long as as long as you’re, let’s say you have a treated post, it might be checked, but it’s still structural problems. We offer post use aluminum mostly for four and six by six. This is the final
Eric [00:18:18] final output stone.
Kyle [00:18:22] So we do offer two different sizes of letters to different lengths. Forty four in one way. And you can you can put those already resisting what posts. If you have a newer wood post, you want to use some kind of like a house wrap or something around that. So protect the. Let’s read a post from the from the fair aluminum on the inside of the post, captain cars are available with those. If you don’t have any posts available, you can use our Mercedes in our ASP and you can do to lie to. Any of the sizes for Aspen, I went and worked with three by three and up, and so it was Grand Prix, so we often see like Free Surface Mall, which is a small street area I call. They had a leveling hardware because this is just for display purposes only. But sort of three by three. And then we also offer those four by four and six by six leaves, the two by two policies a service model as well. And then if you really wanted to inside of here, we’ve got the issue, of course, which is structural and carries up to carries a load up to 500 pounds and you can put a four by four sleep over that as well. And so if you don’t have a workforce available, you can definitely sleep over our entire post as well.
Eric [00:19:40] And that does all the leveling. I mean, when we’ve done the video on this one.
Kyle [00:19:44] So most of you might be familiar with that. But this is not all the hardware. The only thing that doesn’t come with is the statistics statutory substrate. But, you
Eric [00:19:55] know, we’ve obviously done a couple of videos with this now. So don’t mind the mess.
Kyle [00:20:01] And so minor mess. But that’s one of our number one selling items single, single number one selling items. This structural post interviews with any of our railing. We offer aluminum sleeves, vinyl sleeve stuff like that. So yeah, tons of different options for whatever, whatever you have going on with your deck. We’ve got pretty much an option to cover almost everything. OK.
Eric [00:20:26] All right. So that’s.
Kyle [00:20:30] Unless somebody has one quick question,
Eric [00:20:33] she doesn’t look like there are covers at all for today. So I don’t know. Let’s take us out. Let’s see if you guys have any questions. You can always find Kyle and Kyle’s advice on the website, Cologuard railing dot com and our new catalog is on there for the 2022
Kyle [00:20:52] new color literatures on their new new catalog, with all the different new products that we have available on there, as well as pricing with list pricing in it. And if you’re curious what Grand Prix looks like, there’s a section on the website specifically for Grand Prix from Lincoln, for Aspen, for any of our railway lines. You can see what each of them looks like. Use our configurator to see what would take parkways to set up your ducks, and once you submit that, they’ll give you a list pricing on the back end of that. So there’s a lot of different tools you can use to configure whatever you’re looking for for your typical or for your particular duck installation.
Eric [00:21:32] All right, Kyle, thank you again for running this thing, everybody. You have yourself a great day and we’ll talk to you again real soon.
Kyle [00:21:40] Thanks, everybody.